Tag: Splunk

Integrating Splunk ITSI and Observability Cloud for Unified Insights

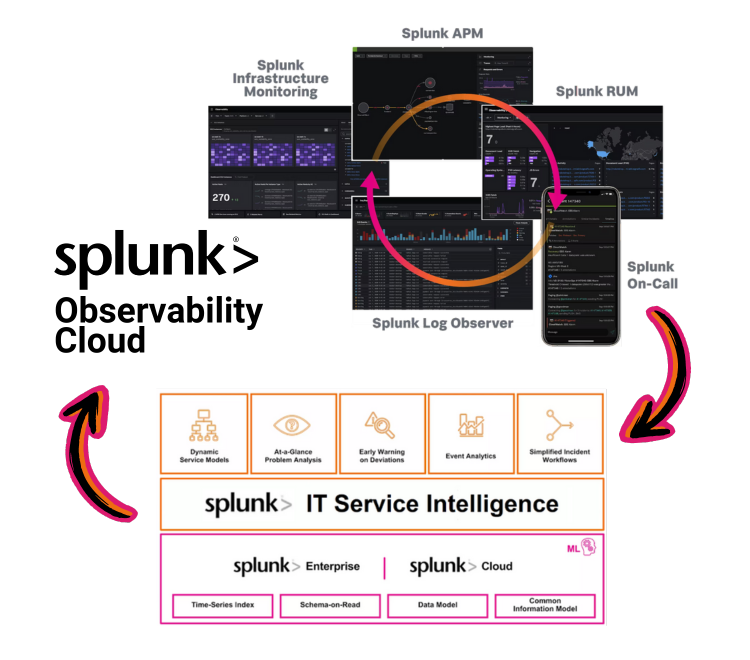
The Splunk Observability Cloud suite (O11y) delivers powerful real-time infrastructure and application monitoring capabilities, while Splunk IT Service Intelligence (ITSI) enables holistic and fully customisable service modelling and impact analysis. When these two technologies are integrated, they effortlessly bridge the gap between tracking infrastructure performance and the overall well-being of your business service.

Making Splunk Core Aware of O11y

A fundamental aspect of integrating ITSI and O11y is making observability metrics available to Splunk Core, and in turn, to Splunk ITSI and IT Essentials Work. For this you’ll need…

This is a Splunk built add-on available on Splunkbase: Splunk Infrastructure Monitoring Add-on.
While the name points to the SIM portion of the O11y suite, the Splunk Infrastructure Monitoring Add-on facilitates access to all O11y metrics, including APM, RUM and Synthetic Monitoring metrics.
NOTE: It is only O11y metric data that can be made available to Splunk Core – not the traces and spans from which these metric results and metadata originate.

SIM Add-on Integration Options

The add-on offers two integration options:
1. Enable Splunk Core to Query O11y Metric Stores
The Splunk Infrastructure Monitoring Add-on introduces a new SPL command called “sim” which allows you to specify a SignalFlow program for querying observability metrics in an SPL search. The SignalFlow program will be run on the remote O11y instance, and the returned metrics can then be processed in the remainder of the SPL search. 

2. Ingesting O11y Metrics into Splunk Indexes
The add-on also contains modular inputs which can be used to index O11y metrics in Splunk Core indexes. You are able to configure these modular inputs by specifying a SignalFlow program which will be run periodically to query the desired O11y metric summaries and index the results in Splunk Core.

NOTE: Ensure that the “stash” source type is always used for the data collected by these modular inputs (as in their default state) so that the collected metrics will not count toward Splunk licence charges.

Where to Install the SIM Add-on

Depending on which integration options are required, the add-on will need to be installed in at least one of these Splunk Core nodes:

Search Heads:
Required on any Search Heads where the “sim” command will be used in SPL searches to query O11y metrics.  In particular, this add-on will be required on Splunk ITSI instances utilising the “sim” command in KPI searches.

Indexers:
Required on any Indexer node/cluster where target metric store indexes are created for ingesting O11y metrics via the SIM add-on modular inputs. The add-on creates an index called “sim_metrics“ which should be used as the default target for O11y metrics as it will not count toward Splunk licence charges (and remember to specify “stash” sourcetype in the modular inputs as noted above).

Forwarders:
Required on any Heavy Forwarder node which will be running the SIM add-on modular inputs to query O11y metrics.

Which Integration Option Is Best?

While it is not possible to give a “one size fits all” answer, consider the following:

The “sim” command is lightning-fast
This is because the metric store of O11y is lightning-fast. By design, the O11y platform is capable of storing and retrieving massive volumes of highly granular data in real time. So performance is rarely a consideration when writing SPL searches using the “sim” command.

The Modular Inputs Duplicate Predetermined Metric Summaries
With the modular inputs of the add-on, you are able to decide ahead of time what O11y metric data you’d like to summarise and index in Splunk Core and at what intervals. While this will only be a subset of the original data that is being indexed, it is still duplication which might not be necessary in a given use case. More to the point, searching the summarised data indexed in Splunk Core lacks the flexibility of using “sim” searches to query metrics directly from O11y, which can be changed on the fly without ever needing to update any modular inputs or re-ingest any data.

Querying O11y directly with the “sim” command would often be the more desirable option.  However, in some scenarios it may be necessary to index O11y metrics in Splunk Core, e.g if security policies prevent certain Splunk Core users from getting direct access to O11y.
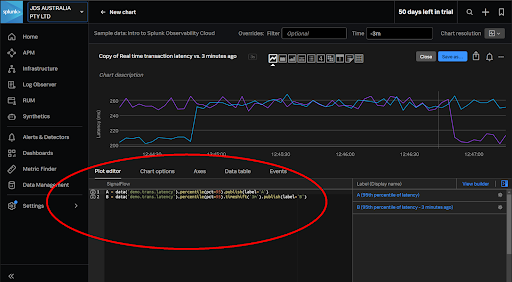
TIP: Use the O11y plot editor to create and test SignalFlow programs which can then be copied into “sim” commands in Splunk Core searches and ITSI KPIs.

Enriching ITSI with O11y Knowledge

The sky’s the limit when modelling systems in ITSI, and for large or complex service models you’ll want to leverage templates and pre-built components instead of re-inventing the wheel.
Content Packs are the mechanism in ITSI for bundling pre-built components, and for O11y content in particular there is…

The Content Pack bundles a set of valuable ITSI knowledge objects which can be leveraged for managing and visualising O11y data, including:
> Services and KPIs
> Service Templates and KPI Base Searches
> Glass Tables and a Service Analyser
> Entity Types and Entity Import Jobs

As with those of any ITSI content pack, many of the above components may not be directly usable for a given use case. They may instead serve as examples or initial templates to the custom content you will be creating.
At the very least, the below entity import jobs from the content pack are invaluable for effortlessly bringing in all O11y-discovered objects to the ITSI entity database:
> ITSI Import Objects – Get_OS_Hosts
> ITSI Import Objects – Get_RUM_*
> ITSI Import Objects – Get_SIM_AWS_*
> ITSI Import Objects – Get_SIM_Azure_*
> ITSI Import Objects – Get_SIM_GCP_*
> ITSI Import Objects – SSM_get_entities_*
> ITSI Import Objects – Splunk-APM Application Entity Search

Whatever the situation, it is in your best interest to install the Content Pack for Splunk Observability Cloud in ITSI when integrating with the O11y suite.

Installing the O11y Content Pack

The latest O11y Content Pack requires the following two add-ons to be installed in the Splunk Core environment first:
> Splunk Infrastructure Monitoring Add-on – The Splunk-built add-on described earlier in this document
> Splunk Synthetic Monitoring Add-on – A SplunkWorks-built add-on (not formally released by Splunk)

Also, if the Content Pack for Splunk Infrastructure monitoring was previously installed in ITSI, then there are additional migration steps to perform before installing the O11y content pack:
> Migrate from the Content Pack for Splunk Infrastructure Monitoring to the Content Pack for Splunk Observability Cloud topic

After the above items are addressed, the method for installing the Content Pack in ITSI is the same as with any other content pack, i.e. via Configuration > Data Integrations > Content Library.
TIP: When installing the content pack, consider using the option of adding a prefix to the names of imported content such as services, service templates and KPI base searches. That way they can be easily identified as examples which can be copied from. This is not so important for items like the entity import jobs (and you may then need to separate imports for differently named objects).

Unified Alerting with O11y and ITSI

In an environment armed with ITSI, an ideal strategy is to consolidate alert management  with ITSI as the central point for processing alerts originating from any Splunk sources such as O11y, as well as from external systems. ITSI’s advanced analytics can be leveraged to implement intelligent alert logic and the alerts actions can interface to Splunk On-Call for escalation management.

This Content Pack is required in ITSI for integrating O11y and ITSI alerting. It comes with correlation searches and aggregation policies that are utilised in the integration procedure (as noted in the High Level Implementation Plan further below).
Installing this Content Pack requires additional version-dependent actions as well as an update to the “Itsi_kpi_attributes” lookup. Please follow the below installation instructions:
Installing and Configuring the Content Pack for ITSI Monitoring and Alerting

Universal Alerting

Splunk have defined the Universal Alerting Field Normalisation Standard in ITSI for which there are pre-built correlation searches provided in the Monitoring and Alerting Content Pack. Normalising alerts to adhere to this schema ensures that alerts from any source can be processed in a common fashion using the pre-built content.
The schema details many fields, many of which are optional, and the following 4 are mandatory for any alert to comply:
> src: the target of the alert, e.g. host, device, service etc.
> signature: a string which uniquely identifies the type of alert
> vendor_severity: the original vendor-specific severity/health/status string
> severity_id: normalised severity

High Level Implementation Plan

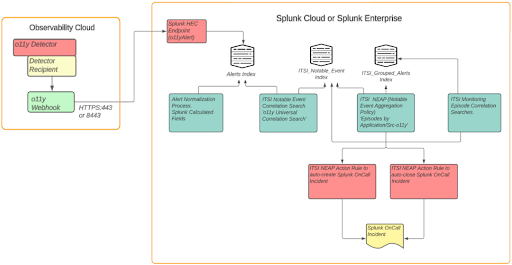
  1. Configure O11y to send alerts to Splunk Enterprise or Cloud Platform:
    This requires creating an alert index in Splunk Core (labelled “Alert Index” in the above diagram), and a HEC endpoint. Then in O11y you can configure a new “Webhook” integration to send alerts to the HEC endpoint.
  2. Normalise O11y alerts to conform to the ITSI Universal Alerting schema
  3. Configure “Universal Correlation Search – o11y” to create notable events:
    This correlation search is shipped with the ITSI Monitoring and Alerting content pack
  4. Configure the “Episodes by Application/SRC o11y” notable event aggregation policy (NEAP):
    Also shipped with the ITSI Monitoring and Alerting content pack
  5. Configure ITSI correlation searches for monitoring aggregated episodes:
    The below 2 searches, also from the content pack:
    “Episode Monitoring – Set Episode to Highest Alarm Severity o11y”
    “Episode Monitoring – Trigger OnCall Incident”
  6. Integrate Splunk On-Call with ITSI:
    This requires installation of the Splunk On-Call (VictorOps) addon in Splunk core, and configuring it with the details of an O11y Splunk On-Call account
  7. Configure action rules in the ITSI NEAP from step 4 for Splunk On-Call Integration
  8. Configure Splunk On-Call with appropriate escalation policies

Full implementation details are documented on the Splunk Lantern site: Managing the lifecycle of an alert from detection to remediation

Next Steps

Now you have the playbook to integrate the Splunk Observability Cloud suite with Splunk ITSI. 
JDS excels in delivering tailored solutions for our customers where we integrate their O11y suite with Splunk ITSI, optimising alert management and reducing Mean Time to Resolution (MTTR).
Reach out if you would like help or advice in improving your observability and troubleshooting efficiency with Splunk Observability Cloud and Splunk ITSI.


Read a recent JDS Customer Success Story here.

Our favourite announcements from Splunk .conf23

Following an incredible week in Vegas for Splunk .conf23, the JDS team is excited to see all the new and upcoming features for the Splunk platform including AI, Observability, Security and IoT.

Here is a recap of some of our favourite announcements from Splunk .conf23:

Splunk Enterprise 9.1

A new Splunk version was released a week prior to Splunk .conf23, which included some welcome features across the board, the main ones being:

  • Improved ingest action to AWS S3
  • New Federated Search modes
  • New features for Dashboard Studio

Searching logs directly in S3 – without having to ingest them into Splunk, is a widely anticipated feature that according to Splunk Docs, should be generally available very soon. With customers often struggling to balance their licensing for ingestion and retention, this feature will allow customers to keep low-value or old data in S3 while still being able to search it.

Splunk AI Assistant

The newly announced AI Assistant will not only help users find data within the Splunk platform, but will also generate SPL to search and report on it. The AI Assistant app is currently in preview but customers can sign-up to download the app at https://pre-release.splunk.com/preview/aiassist

Splunk Cloud

Splunk and Microsoft have formed a strategic partnership to bring Splunk Cloud to customers that are leveraging Azure as their cloud platform of choice, supplementing Splunk’s existing offerings with AWS and GCP.    

As a result of this partnership, Splunk and Microsoft have committed to developing more “out-of-the-box” integration capabilities. In addition, customers will now be able to spend Azure credits to buy Splunk Core, Enterprise Security and ITSI in their customer-managed environments. This is expected to be rolled out globally over the next year.

Splunk AIOps

Splunk announced the release of the Splunk App for Anomaly Detection. Anomaly Detection is already included in the existing Machine Learning Toolkit (MLTK) app but this new app has a guided wizard which will make setting up Anomaly Detection easier for users that don’t have a background in Machine Learning (ML).

The Deep Learning Toolkit has also received an update (5.1) and a rename to the “Splunk App for Data Science and Deep Learning”. It now includes a “Neural Network Designer Assistant” once again improving the accessibility of ML to those without a ML background.

One other small ML improvement is in ITSI’s Adaptive Threshold feature. Adaptive Thresholds, which dynamically creates thresholds based on historical data, can now be configured to ignore anomalies. For example, a recent P1 incident that resulted in a spike of a KPI will be excluded from threshold calculation, resulting in more accurate thresholds.

Security

TwinWave, which Splunk bought in Nov 2022, has been integrated into the Splunk portfolio and renamed Splunk Attack Analyzer. It boasts a tight integration with Splunk SOAR so that customers can automate the detonation of suspicious URLs and files in unattributable environments and subsequently feed the results back into the SOAR platform.

Enterprise Security Content Update (ESCU) 4.6 has also been released, including 6 new ML detections written by the Splunk Threat Research Team to protect against the latest threats that are being observed in the wild.

Observability 

ITSI 4.17.0 was released at the beginning of June, focusing more on improving the platform than adding new features. A couple of these improvements are:

  • Saved Searches within content packs are disabled by default.
  • A new entity clean-up command which removes searches that are no longer creating or updating entities. 
  • New dashboards to troubleshoot entity discovery issues.
  • KPI sparklines have been updated so they no longer have the “spiky” up & down visual on small time ranges – This was a common complaint from all ITSI customers.
  • Custom dashboards for viewing episodes – Each episode can now show a custom SimpleXML or Dashboard Studio dashboard so customers can customise what is shown inside of the Episode Review page. https://docs.splunk.com/Documentation/ITSI/latest/EA/EpisodeInfo#Add_an_episode_dashboard

Another welcome announcement was the introduction of Unified Identity, which enables users to log into Splunk Observability Cloud with SSO using their Splunk Cloud Platform credentials.

Splunk Edge Hub

Splunk formally announced Edge Hub at .conf, though we’ve already heard of a few organisations trying them out. It’s purpose is to combat the “data deluge” by filtering & aggregating data before it leaves the local network via Internet or internal WAN, but It’s also capable of collecting various environmental sensors (temperature, noise levels, etc) out-of-the-box. Better yet, you can see these stats directly from the built-in screen. We look forward to seeing how customers use these devices in their environments.

Splunk Edge Processor

Splunk has also added some important features to the Edge Processor product. Customers can now export their data to Splunk using Splunk HEC (HTTP Event Collector), which is easier for customers to manage. In addition, the long-awaited SPL2 has also been added to Edge Processor which is interesting because it’s yet to reach many other products (ie Splunk Core). SPL2 extends SPL with many more commands that will make it easier for customers to parse and manipulate their data in Edge Processor before it gets sent into Splunk.

It’s an exciting time for Splunk users, and JDS is pumped to be at the forefront of these latest advancements. 

JDS Australia Named 2022 Splunk APAC Services Partner of the Year

JDS Australia announced today it has received the 2022 APAC Services Partner of the Year for exceptional performance and commitment to Splunk’s Partnerverse. The APAC Services Partner of the Year award recognizes an APAC Splunk partner that is actively engaged in services implementations, in addition to having a strong commitment to training and certification of their organisation.   

“We’re thrilled to be awarded the 2022 APAC Services Partner of the Year.  I’m so proud of our team for the recognition, as it is a clear demonstration of their tireless commitment to being the most knowledgable and experienced Splunk partner in the region,” said Brian Grant, JDS Splunk General Manager. “We value our ongoing partnership with Splunk and look forward to another successful year of collaboration.”

“Congratulations to JDS Australia for being named the 2022 APAC Services Partner of the Year,” said Bill Hustad, Vice President of Alliances and Channel Ecosystems Splunk. “The 2022 Splunk Global Partner Awards recognize outstanding partners like JDS that drive positive business outcomes, as well as help our joint customers leverage Splunk to solve their challenges. Additionally, JDS works in collaboration with Splunk and shares our customer-first mentality.”

The Splunk Global Partner Awards recognize partners of the Splunk ecosystem for industry-leading business practices and dedication to constant collaboration. All award recipients were selected by a group of the Splunk executives, theater leaders and the global partner organisation. 

Splunk

As a Splunk Elite partner, JDS has a dedicated Splunk practice with expertise spanning ITOps, AIOps, and Security. JDS has proven to be trusted advisors and provide a safe pair of hands to architect, implement and manage Splunk for many organisations across a wide range of use cases.


IT Service Intelligence / Business Service Insights

Customisable business dashboards, mapped to key performance indicators, can provide invaluable real-time visibility into the health of your digital services. Our skilled JDS team have extensive experience in implementing Splunk’s unique platform to assist organisations ensure uninterrupted access to critical services.


IT Operations, Analytics and AIOps

JDS can transform your entire IT Ops approach with a suite of tools that put AI and machine learning at their core, allowing you to predict and prevent, instead of triage and react.  We enable a genuine understanding of the complete environment to get ahead of issues before they occur.


End to End Application Visibility

Gaining End-to-End Visibility means unifying business, application and infrastructure health for full-stack observability of critical apps and services.  With JDS and Splunk, gain the ability to visualise the health of your services at a glance, and make smarter, data-driven decisions.

Enterprise Security and Analytics

Splunk is renowned for its Security Information and Event Management (SIEM) and Security Orchestration, Automation and Response (SOAR) capabilities and JDS has the experience to establish and build out these capabilities along with the integrations to related systems.


Call Centre Visibility

Having insights into how your call centre is responding to customers can improve efficiency, effectiveness, quality of service and the overall customer experience. Using Splunk’s Contact Center Analytics, JDS can unlock this vital visibility, whether you’re working with centralized call centres or remote agents.

Splunk Cloud Migrations

JDS will help you to minimise downtime whilst maximising your architecture when migrating to Splunk Cloud. Our experts lead a collaborative engagement to make the transition as seamless as possible, while maintaining full visibility into your infrastructure before, during and after migration.

Success Stories

Transforming operations at Transurban with Splunk ITSI >

Helping one of Australia’s largest banking institutions migrate seamlessly to Splunk Cloud >

Unifying Insights with a Splunk ITSI and Observability Cloud Integration >

5 Ways uberAgent Measures Your Employee Digital Experience

Measuring employee digital experience is a great way to assess how well your systems are performing. With the move to working from home there is now greater importance in making sure your IT services can support multiple device types and varying network conditions. This scenario is where uberAgent shines.

uberAgent is a user experience monitoring and endpoint security analytics product that integrates with your Splunk environment. uberAgent provides rich details on user experience whether they are on a Mac, PC, Surface, or virtual desktop like Citrix or VMware.

Here are 5 ways uberAgent can help you evaluate your employees’ end-user experience – and troubleshoot any issues.

Logon Monitoring

A logon is your first chance to make a good impression. No one likes to wait, so when users start to complain of slow logon times you need access to everyone’s details to understand what is going on. uberAgent for Splunk captures everything you will need, giving you everyone’s logon time, and where that time is being spent. You can review the details for a group of users, or drill-down to one specific user.

Logon time is broken down by the shell startup, group policy processing, profile loading, and group policy and AD logon scripts. You can compare users with different characteristics to help identify where time is being spent. If your group policy is taking too long for some users, you can drill down to see how much time each policy is taking. 

Logon Monitoring dashboard

Application Usage

Measuring the user experience of applications can benefit both application owners and end users. If users are reporting slow performance, it is important to understand what is happening on the system. Is performance poor due to the user’s memory or CPU? Is storage or bad network connectivity the issue? Could it be slow because of the many tabs open in their web browser? Or is the issue firmly with the application?

uberAgent will give you a clear picture of what is happening on each user’s device. Comparing all users can provide insights into how applications are performing throughout the day. You can view details about crashes, load times, memory/CPU/disk usage, network connectivity problems, and even understand how often the app freezes.

There are many other benefits to getting a full catalog of deployed applications. uberAgent tells you which applications are installed, and which of those are used. You can understand how many licenses will be needed for an application, and plan purchases and upgrades around usage.

Application Performance dashboard

Network Monitoring

A user’s internet connection can play a large role in the perceived performance of applications.  When users are working remotely, they may not always have access to high-speed internet connections. With uberAgent’s network monitoring capability you can easily see how much data is being transferred, to where, and exactly how long that took. Built in dashboards can show you connectivity issues broken down by user or application. You can separate latency issues in Citrix sessions and latency in Citrix hosted applications, helping identify if the user’s connection or an issue at the data centre is the cause.

Network Communications dashboard

Browser Application Experience

With the shift to cloud and web-based UIs, it is important to include web application performance in measuring overall user experience. With plugins for Internet Explorer, Firefox, and Chrome, uberAgent can delve into the browser experience without needing any code changes to the monitored apps.

Details about page load times, render time, network communications, errors, and more are available by application or web page. Measure the performance of web-based apps whether they are hosted internally or available in the cloud.

The light-weight plugin is a trusted solution with over 600,000 downloads in the Chrome store.

Browser App Performance dashboard

Experience Score Dashboard

Individual metrics are useful for troubleshooting individual issues. To get a clear picture of the overall user experience, uberAgent creates a single user experience score. The experience score is a single view that shows the current and past status of all devices, applications, and users monitored by uberAgent. It allows for proactive monitoring of your environment, reducing downtimes and costs.

The trend of this score can let you know how the user experience is going, and allow you to compare scores across different days, users, or applications.

The experience score dashboard calculates and visualises experience scores for the entire userbase, breaking the data down by category and component, highlighting components where potential issues are originating from. The dashboard also provides quick access to important KPIs like logon duration, application responsiveness, and application errors.

Experience Score dashboard

These five benefits are just the start – uberAgent has many more features built in. With the flexibility of the Splunk platform you can even extend the dashboards, alerts, and reports to suit your own requirements.

JDS has extensive experience successfully configuring uberAgent for our customers. JDS is a gold partner of uberAgent, so we can install, configure, and provide you with licenses. If you would like to take advantage of the impressive user experience monitoring capability of uberAgent, get in touch with JDS today.

Implementing Salesforce monitoring in Splunk

The problem

A JDS customer embarked on a project to implement Salesforce to provide their users a single user interface to fulfil their customer needs.  Their aim, to make the interface easy to use and reduce the time to process customer requests.  At the same time, the business had to ensure that their customer data stored in Salesforce was secure and to be able to detect any malicious use.

The Solution

Implementing Splunk with the Splunk Add-on for Salesforce enabled the collection of logs and objects from Salesforce using REST APIs.  This in turn, enabled proactive alerting and the creation of informative dashboards and reports to satisfy the business’ security requirements.

Scenarios detected:

  • Failed or unusual login attempts (same user tries to login from multiple IP addresses)
  • Large amounts of data extracted from Salesforce
  • Unauthorised changes in Salesforce configuration such as Connected Apps settings or Authentication Provider settings
  • Integration user account activity occurring outside of scheduled job runs
  • Privileged user activity
  • Apex code execution

All of this was achieved by setting up the required data inputs via the Splunk Add-on.  Creating lookups to enhance the alert content with meaningful information and macros for re-usability and ease of administration, then adding alerts to ensure the required conditions were notified to the operational support teams.

Splunk dashboards and reports built on Salesforce data allowed the business to easily view login patterns and analyse EventLog events and Setup Audit Trail changes.  Additionally, Salesforce data ingestion and alert summary dashboards were added to assist the support team to identify issues or delays in data ingestion as well as review the number of alerts being generated over time.

When developing any application that provides access to secure information, it’s important to not only monitor in terms of user experience, but also look at security aspects. Our customer was able to satisfy the security monitoring requirements of the business with the Splunk Add-on for Salesforce and achieved their go-live target date. The configured alerts will keep them informed of any potential security issues, giving them confidence that the platform is secure. The accompanying dashboards provide an intuitive summary of user actions, all backed by an extended data retention policy in Splunk to satisfy regulatory compliance. With SalesForce data now available in Splunk, they are planning additional use cases to not only monitor security, but get insights into how the platform is used by employees.

Why choose JDS?

JDS has experience and expertise in bringing SalesForce application data into Splunk . If your focus is on security, performance, or custom monitoring, speak to JDS today about how we can convert your SalesForce data into useful insights.

Finding Exoplanets with Splunk

Splunk is a software platform designed to search, analyze and visualize machine-generated data, making sense of what, to most of us, looks like chaos.

Ordinarily, the machine data used by Splunk is gathered from websites, applications, servers, network equipment, sensors, IoT (internet-of-things) devices, etc, but there’s no limit to the complexity of data Splunk can consume.

Splunk specializes in Big Data, so why not use it to search the biggest data of all and find exoplanets?

What is an exoplanet?

An exoplanet is a planet in orbit around another star.

The first confirmed exoplanet was discovered in 1995 orbiting the star 51 Pegasi, which makes this an exciting new, emerging field of astronomy. Since then, Earth-based and space-based telescopes such as Kepler have been used to detect thousands of planets around other stars.

At first, the only planets we found were super-hot Jupiters, enormous gas giants orbiting close to their host stars. As techniques have been refined, thousands of exoplanets have been discovered at all sizes and out to distances comparable with planets in our own solar system. We have even discovered exomoons!


How do you find an exoplanet?

Imagine standing on stage at a rock concert, peering toward the back of the auditorium, staring straight at one of the spotlights. Now, try to figure out when a mosquito flies past that blinding light. In essence, that’s what telescopes like NASA’s TESS (Transiting Exoplanet Survey Satellite) are doing.

The dip in starlight intensity can be just a fraction of a percent, but it’s enough to signal that a planet is transiting the star.

Transits have been observed for hundreds of years in one form or another, but only recently has this idea been applied outside our solar system.

Australia has a long history of human exploration, starting some 60,000 years ago. In 1769 after (the then) Lieutenant James Cook sailed to Tahiti to observe the transit of Venus across the face of the our closest star, the Sun, he was ordered to begin a new search for the Great Southern Land which we know as Australia. Cook’s observation of the transit of Venus used largely the same technique as NASA’s Hubble, Kepler and TESS space telescopes but on a much simpler scale.

Our ability to monitor planetary transits has improved considerably since the 1700s.

NASA’s TESS orbiting telescope can cover an area 400 times as broad as NASA’s Kepler space telescope and is capable of monitoring a wider range of star types than Kepler, so we are on the verge of finding tens of thousands of exoplanets, some of which may contain life!

How can we use Splunk to find an exoplanet?

 Science thrives on open data.

All the raw information captured by both Earth-based and space-based telescopes like TESS are publicly available, but there’s a mountain of data to sift through and it’s difficult to spot needles in this celestial haystack, making this an ideal problem for Splunk to solve.

While playing with this over Christmas, I used the NASA Exoplanet Archive, and specifically the PhotoMetric data containing 642 light curves to look for exoplanets. I used wget in Linux to retrieve the raw data as text files, but it is possible to retrieve this data via web services.

MAST, the Mikulski Archive for Space Telescopes, has made available a web API that allows up to 500,000 records to be retrieved at a time using JSON format, making the data even more accessible to Splunk.

Some examples of API queries that can be run against the MAST are:

The raw data for a given observation appears as:

Information from the various telescopes does differ in format and structure, but it’s all stored in text files that can be interrogated by Splunk.

Values like the name of the star (in this case, Gliese 436) are identified in the header, while dates are stored either using HJD (Heliocentric Julian Dates) or BJD (Barycentric Julian Dates) centering on the Sun (with a difference of only 4 seconds between them).

Some observatories will use MJD which is the Modified Julian Date (being the Julian Date minus 2,400,000.5 which equates to November 17, 1858). Sounds complicated, but MJD is an attempt to simplify date calculations.

Think of HJD, BJD and MJD like UTC but for the entire solar system.

One of the challenges faced in gathering this data is that the column metadata is split over three lines, with the title, the data type and the measurement unit all appearing on separate lines.

The actual data captured by the telescope doesn’t start being displayed until line 138 (and this changes from file to file as various telescopes and observation sets have different amounts of associated metadata).

In this example, our columns are…

  • HJD - which is expressed as days, with the values beyond the decimal point being the fraction of that day when the observation occurred
  • Normalized Flux - which is the apparent brightness of the star
  • Normalized Flux Uncertainty - capturing any potential anomalies detected during the collection process that might cast doubt on the result (so long as this is insignificant it can be ignored).

Heliocentric Julian Dates (HJD) are measured from noon (instead of midnight) on 1 January 4713 BC and are represented by numbers into the millions, like 2,455,059.6261813 where the integer is the days elapsed since then, while the decimal fraction is the portion of the day. With a ratio of 0.00001 to 0.864 seconds, multiplying the fraction by 86400 will give us the seconds elapsed since noon on any given Julian Day. Confused? Well, your computer won’t be as it loves working in decimals and fractions, so although this system may seem counterintuitive, it makes date calculations simple math.

We can reverse engineer Epoch dates and regular dates from HJD/BJD, giving Splunk something to work with other than obscure heliocentric dates.

  • As Julian Dates start at noon rather than midnight, all our calculations are shifted by half a day to align with Epoch (Unix time)
  • The Julian date for the start of Epoch on CE 1970 January 1st 00:00:00.0 UT is 2440587.500000
  • Any-Julian-Date-minus-Epoch = 2455059.6261813 - 2440587.5 = 14472.12618
  • Epoch-Day = floor(Any-Julian-Date-minus-Epoch) * milliseconds-in-a-day = 14472 * 86400000 = 1250380800000
  • Epoch-Time = floor((Any-Julian-Date-minus-Epoch – floor(Any-Julian-Date-minus-Epoch)) * milliseconds-in-a-day = floor(0. 6261813 * 86400000) = 10902064
  • Observation-Epoch-Day-Time = Epoch-Day + Epoch-Time = 1250380800000 + 10902064 = 1250391702064

That might seem a little convoluted, but we now have a way of translating astronomical date/times into something Splunk can understand.

I added a bunch of date calculations like this to my props.conf file so dates would appear more naturally within Splunk.

[exoplanets]

SHOULD_LINEMERGE = false

LINE_BREAKER = ([\r\n]+)

EVAL-exo_observation_epoch = ((FLOOR(exo_HJD - 2440587.5) * 86400000) + FLOOR(((exo_HJD - 2440587.5) - FLOOR(exo_HJD - 2440587.5))  *  86400000))

EVAL-exo_observation_date = (strftime(((FLOOR(exo_HJD - 2440587.5) * 86400000) + FLOOR(((exo_HJD - 2440587.5) - FLOOR(exo_HJD - 2440587.5))  *  86400000)) / 1000,"%d/%m/%Y %H:%M:%S.%3N"))

EVAL-_time = strptime((strftime(((FLOOR(exo_HJD - 2440587.5) * 86400000) + FLOOR(((exo_HJD - 2440587.5) - FLOOR(exo_HJD - 2440587.5))  *  86400000)) / 1000,"%d/%m/%Y %H:%M:%S.%3N")),"%d/%m/%Y %H:%M:%S.%3N")

Once date conversions are in place, we can start crafting queries that map the relative flux of a star and allow us to observe exoplanets in another solar system.

Let’s look at a star with the unassuming ID 0300059.

sourcetype=exoplanets host="0300059"

| rex field=_raw "\s+(?P<exo_HJD>24\d+.\d+)\s+(?P<exo_flux>[-]?\d+.\d+)\s+(?P<exo_flux_uncertainty>[-]?\d+.\d+)" | timechart span=1s avg(exo_flux)

And there it is… an exoplanet blotting out a small fraction of starlight as it passes between us and its host star!

What about us?

While curating the Twitter account @RealScientists, Dr. Jessie Christiansen made the point that we only see planets transit stars like this if they’re orbiting on the same plane we’re observing. She also pointed out that “if you were an alien civilization looking at our solar system, and you were lined up just right, every 365 days you would see a (very tiny! 0.01%!!) dip in the brightness that would last for 10 hours or so. That would be Earth!”

There have even been direct observations of planets in orbit around stars, looking down from above (or up from beneath depending on your vantage point). With the next generation of space telescopes, like the James Webb, we’ll be able to see these in greater detail.


Image credit: NASA exoplanet exploration

Next steps

From here, the sky’s the limit—quite literally.

Now we’ve brought data into Splunk we can begin to examine trends over time.

Astronomy is BIG DATA in all caps. The Square Kilometer Array (SKA), which comes on line in 2020, will create more data each day than is produced on the Internet in a year!

Astronomical data is the biggest of the Big Data sets and that poses a problem for scientists. There’s so much data it is impossible to mine it all thoroughly. This has led to the emergence of citizen science, where regular people can contribute to scientific discoveries using tools like Splunk.

Most stars have multiple planets, so some complex math is required to distinguish between them, looking at the frequency, magnitude and duration of their transits to identify them individually. Over the course of billions of years, the motion of planets around a star fall into a pattern known as orbital resonance, which is something that can be predicted and tested by Splunk to distinguish between planets and even be used to predict undetected planets!

Then there’s the tantalizing possibility of exomoons orbiting exoplanets. These moons would appear as a slight dip in the transit line (similar to what’s seen above at the end of the exoplanet’s transit). But confirming the existence of an exomoon relies on repeated observations, clearly distinguished from the motion of other planets around that star. Once isolated, the transit lines should show a dip in different locations for different transits (revealing how the exomoon is swinging out to the side of the planet and increasing the amount of light being blocked at that point).

Given its strength with modelling data, predictive analytics and machine learning, Splunk is an ideal platform to support the search for exoplanets.

Find out more

If you’d like to learn more about how Splunk can help your organization reach for the stars, contact one of our account managers.

Our team on the case

Our Splunk stories

Event: What will drive the next wave of business innovation?

It’s no secret that senior managers and C-level executives are constantly wading through the latest buzzwords and jargon as they try to determine the best strategies for their business. Disruption, digital transformation, robots are taking our jobs, AI, AIOps, DevSecOps… all of the “next big thing” headlines, terms, clickbait articles, and sensationalism paint a distorted picture of what the business technology landscape really is.

Understand the reality amongst the virtuality, and make sense of what technology will drive the next wave of business innovation.

Join Tim Dillon, founder  of Tech Research Asia (TRA), for a presentation that blends technology market research trends with examples from Australian businesses already deploying solutions in areas such as cloud computing, intelligent analytics, robotics, artificial intelligence, and “the realities” (mixed, virtual, and augmented). Tim will examine when these innovation technologies will genuinely transform Australian industry sectors as well as the adoption and deployment plans of your peers. Not just a theoretical view, the presentation will provide practical tips and learnings drawn from real-life use cases.

Hosted by JDS Australia and Splunk, this is an event not to be missed by any executive who wants an industry insider view of what’s happening in technology in 2018, and where we’re headed in the future.

When: Tuesday 1 May, 11.45am-2pm (includes welcome drinks and post-event networking)

Where: Hilton Brisbane, 190 Elizabeth St, Brisbane City, QLD 4000

Cost: Complimentary

Agenda

11.45-12.30 Registration, canapes and drinks

12.30-12.40 Opening: Gene Kaalsen, Splunk Practice Manager, JDS Australia

12.35-1.05 Presentation: Tim Dillon

1.05-1.20 Q and A

1.20-1.25 Closing: Amanda Lugton, Enterprise Sales Manager, Splunk

1.25- 2.00 Networking, drinks and canapes

By clicking this button, you submit your information to JDS Australia, who will use it to communicate with you about this enquiry and their other services.

Tim Dillon, Founder and Director, Tech Research Asia

Tim is passionate about the application of technology for business benefit. He has been involved in business and technology research and analysis since 1991. In July 2012 he established Tech Research Asia (www.techresearch.asia) to provide bespoke analyst services to vendors in the IT&T sector. From 2007 to late 2012, he held the role of IDC’s Associate Vice President Enterprise Mobility and End-User (Business) research, Asia Pacific. Prior to this he was Current Analysis’ (now Global Data) Director of Global Telecoms Research and European and Asia Pacific Research Director.

For a period of time he also worked with one of Europe’s leading competitive intelligence research houses as research director with a personal focus on the telecoms and IT sectors. He combines more than 20 years of business and technology research with a blend of professional, international experience in Australia, Asia Pacific, and Europe. Of late, his particular areas of interest have centred upon emerging innovation technologies such as AI, virtual and augmented realities, security and data management, and governance. Tim truly delights in presenting, facilitating, and communicating with organisations and audiences discussing how trends and development in technology will shape the future business environment. 

A strong communicator, he has presented to large (1500+) audiences through to small, intimate round table discussions. A high proportion of Tim’s roles have been client focused—leading and delivering consulting projects or presenting at client conferences and events and authoring advisory reports. A regular participant in industry judging panels, Tim also works with event companies in an advisory role to help create strong, relevant technology business driven agendas. He has also authored expert witness documents for cases relating to the Australian telecommunication markets. A Tasmanian by birth, Tim holds a Bachelor of Economics from the University of Tasmania.

Event: What can Splunk do for you?

Registration Form

By clicking this button, you submit your information to JDS Australia, who will use it to communicate with you about this event and their other services.

Event Details

Splunk .conf2017 was one of the biggest events of the year, with thousands gathering in Washington D.C. to experience the latest Splunk has to offer. One of JDS' senior consultants and Splunk experts, Michael Clayfield, delivered two exceptional presentations highlighting specific Splunk capabilities and how JDS can work with businesses to make them happen.

We don't want our Australian clients to miss out on hearing these exciting presentations, which is why we are pleased to invite you to our .conf17 recap event in Melbourne. You'll get to hear both presentations, and will also have a chance to chat with account executives and discuss Splunk solutions for your business.

The presentations will cover:

  • Using Active Robot Monitoring with Splunk to Improve Application Performance
  • Running Splunk within Docker

When: Thursday 23 November, 5-8pm 
Where:
Splunk Melbourne Office, Level 16, North Tower, 525 Collins Street

Case Study: Netwealth bolster their security with Splunk

The prompt and decision

"As a financial services organisation, information security and system availability are core to the success of our business. With the business growing, we needed a solution that was scalable and which allowed our team to focus on high-value management tasks rather than on data collection and review."

Information security is vital to modern organisations, and particularly for those that deal in sensitive data, such as Netwealth. It is essential to actively assess software applications for security weaknesses to prevent exploitation and access by third parties, who could otherwise extract confidential and proprietary information. Security monitoring looks for abnormal behaviours and trends that could indicate a security breach.

"The continued growth of the business and the increased sophistication of threats prompted us to look for a better way to bring together our security and IT operations information and events," explains Chris Foong, Technology Infrastructure Manager at Netwealth. "Advancements in the technology available in this space over the last few years meant that a number of attractive options were available."

The first stage in Netwealth’s project was to select the right tool for the job, with several options short-listed. Each of these options was pilot tested, to establish which was the best fit to the requirements—and Splunk, with its high versatility and ease of use, was the selected solution.

The power in the solution comes from Splunk’s ability to combine multiple real-time data flows with machine learning and analysis which prioritises threats and actions, and the use of dynamic visual correlations and on-demand custom queries to more easily triage threats. Together, this empowers IT to make informed decisions.

Objective

Netwealth’s business objective was to implement a security information and event management (‘SIEM’) compliant tool to enhance management of security vulnerabilities and reporting. Their existing tool no longer met the expanding needs of the business, and so they looked to Splunk and JDS to provide a solution.

Approach

Netwealth conducted a proof of concept with various tools, and Splunk was selected. JDS Australia, as Splunk Implementation Partner, provided licensing and expertise.

IT improvements

Implementing Splunk monitoring gave Netwealth enhanced visibility over their security environment, and the movement of sensitive data through the business. This enabled them to triage security events and vulnerabilities in real time.

About Netwealth

Founded in 1999, Netwealth was established to provide astute investors and wealth professionals with a better way to invest, protect and manage their current and future wealth. As a business, Netwealth seeks to enable, educate and inspire Australians to see wealth differently and to discover a brighter future.

Netwealth offers a range of innovative portfolio administration, superannuation, retirement, investment, and managed account solutions to investors and non-institutional intermediaries including financial advisers, private clients, and high net worth firms.

Industry

Financial Services

Primary applications

  • Office365
  • Fortigate
  • IIS
  • Juniper SRX
  • Microsoft DNS
  • Microsoft AD and ADFS (Active Directory Federation Services)
  • JBoss (Java EE Application Server)
  • Fortinet

Primary software

  • Splunk Enterprise
  • Splunk Enterprise Security (application add-on)

The process

Now that Splunk had been identified as the best tool for the job, it was time to find an Implementation Partner—and that’s where JDS came in. JDS, as the most-certified Australian Splunk partner, was the natural choice. "JDS provided Splunk licensing, expertise on integrating data sources, and knowledge transfer to our internal team," says Foong.  

An agile, project managed approach was taken.  

  1. Understand the business requirements and potential threats associated with Netwealth’s environment.
  2. Identify the various services that required security monitoring.
  3. Identify the data feed for those services.
  4. Deploy and configure core Splunk.
  5. Deploy the Enterprise Security application onto Splunk.
  6. Configure the Enterprise Security application to enable features. These features gave visibility into areas of particular concern.

The JDS difference

For this project, JDS "assisted Netwealth in deploying and configuring Splunk, and gaining confidence in Splunk Enterprise Security," explains the JDS Consultant on the case. "We were engaged as a trusted partner with Splunk, and within hours of deployment, we had helped Netwealth to gain greater visibility of the environment."

JDS were able to leverage their Splunk expertise to give added value to the client, advising them on how to gain maximum value in terms of both project staging, and in the onboarding of new applications. "We advocated a services approach—start by designing the dashboard you want, and work backwards towards the data required to build that dashboard."

"The JDS team worked well with our team, were knowledgeable about the product, and happy to share that knowledge with our team," says Netwealth’s Chris Foong. "They delivered what they said they would, and didn’t under- or over-sell themselves. We would work with them again."

End results

Chris Foong says that Netwealth was looking for "improved visibility over security and IT operations information and events, to aid in faster response and recovery"—and the project was a success on all counts.

"The project was delivered on time and to budget, and Splunk is now capturing data from all the required sources," adds Foong. "We also identified a number of additional use cases, over and above the base Enterprise Security case, such as rapidly troubleshooting performance degradation."

Now that Netwealth has implemented Splunk, the software has further applicability across the business. The next step is continuing to leverage Splunk, and JDS will be there to help.

Business Benefits

  • Gave Netwealth better visibility into the organisation’s security posture
  • Presents the opportunity for leveraging of Splunk in other areas of the business; for example, marketing
  • Allows Netwealth to have greater visibility into application and business statistics, with the potential to overlay machine learning and advanced statistical analysis of this business information

The Splunk Gardener

The Splunk wizards at JDS are a talented bunch, dedicated to finding solutions—including in unexpected places. So when Sydney-based consultant Michael Clayfield suffered the tragedy of some dead plants in his garden, he did what our team do best: ensure it works (or ‘lives’, in this case). Using Splunk’s flexible yet powerful capabilities, he implemented monitoring, automation, and custom reporting on his herb garden, to ensure that tragedy didn’t strike twice.

My herb garden consists of three roughly 30cm x 40cm pots, each containing a single plant—rosemary, basil, and chilli. The garden is located outside our upstairs window and receives mostly full sunlight. While that’s good for the plants, it makes it harder to keep them properly watered, particularly during the summer months. After losing my basil and chilli bush over Christmas break, I decided to automate the watering of my three pots, to minimise the chance of losing any more plants. So I went away and designed an auto-watering setup, using soil moisture sensors, relays, pumps, and an Arduino—an open-source electronic platform—to tie it all together.

Testing the setup by transferring water from one bottle to another.

I placed soil moisture sensors in the basil and the chilli pots—given how hardy the rosemary was, I figured I could just hook it up to be watered whenever the basil in the pot next to it was watered. I connected the pumps to the relays, and rigged up some hosing to connect the pumps with their water source (a 10L container) and the pots. When the moisture level of a pot got below a certain level, the Arduino would turn the equivalent pump on and water it for a few seconds. This setup worked well—the plants were still alive—except that I had no visibility over what was going on. All I could see was that the water level in the tank was decreasing. It was essential that the tank always had water in it, otherwise I'd ruin my pumps by pumping air.

To address this problem, I added a float switch to the tank, as I was aiming to set it up so I could stop pumping air if I forgot to fill up the tank. Using a WiFi adapter, I connected the Arduino to my home WiFi. Now that the Arduino was connected to the internet, I figured I should send the data into Splunk. That way I'd be able to set up an alert notifying me when the tank’s water level was low. I'd also be able to track each plant’s moisture levels.

The setup deployed: the water tank is on the left; the yellow cables coming from the tank are for the float switch; and the plastic container houses the pumps and the Arduino, with the red/blue/black wires going to the sensors planted in the soil of the middle (basil) and right (chilli) pots. Power is supplied via the two black cables, which venture back inside the house to a phone charger.

Using the Arduino’s Wifi library, it’s easy to send data to a TCP port. This means that all I needed to do to start collecting data in Splunk was to set up a TCP data input. Pretty quickly I had sensor data from both my chilli and basil plants, along with the tank’s water status. Given how simple it was, I decided to add a few other sensors to the Arduino: temperature, humidity, and light level. With all this information nicely ingested into Splunk, I went about creating a dashboard to display the health of my now over-engineered garden.

The overview dashboard for my garden. The top left and centre show current temperature and humidity, including trend, while the top right shows the current light reading. The bottom left and centre show current moisture reading and the last time each plant was watered. The final panel in the bottom right gives the status of the tank's water level.

With this data coming in, I was able to easily understand what was going on with my plants:

  1. I can easily see the effect watering has on my plants, via the moisture levels (lower numbers = more moisture). I generally aim to maintain the moisture level between 300 and 410. Over 410 and the soil starts getting quite dry, while putting the moisture probe in a glass of water reads 220—so it’s probably best to keep it well above that.
  2. My basil was much thirstier than my chilli bush, requiring about 50–75% more water.
  3. It can get quite hot in the sun on our windowsill. One fortnight in February recorded nine 37+ degree days, with the temperature hitting 47 degrees twice during that period.
  4. During the height of summer, the tank typically holds 7–10 days’ worth of water.

Having this data in Splunk also alerts me to when the system isn't working properly. On one occasion in February, I noticed that my dashboard was consistently displaying that the basil pot had been watered within the last 15 minutes. After a few minutes looking at the data, I was able to figure out what was going on.

Using the above graph from my garden’s Splunk dashboard, I could see that my setup had correctly identified that the basil pot needed to be watered and had watered it—but I wasn't seeing the expected change in the basil’s moisture level. So the next time the system checked the moisture level, it saw that the plant needed to be watered, watered it again, and the cycle continued. When I physically checked the system, I could see that the Arduino was correctly setting the relay and turning the pump on, but no water was flowing. After further investigation, I discovered that the pump had died. Once I had replaced the faulty pump, everything returned to normal.

Since my initial design, I have upgraded the system a few times. It now joins a number of other Arduinos I have around the house, sending data via cheap radio transmitters to a central Arduino that then forwards the data on to Splunk. Aside from the pump dying, the garden system has been functioning well for the past six months, providing me with data that I will use to continue making the system a bit smarter about how and when it waters my plants.

I've also 3D printed a nice case in UV-resistant plastic, so my gardening system no longer has to live in an old lunchbox.

Our team on the case

Using Splunk and Active Robot Monitoring to resolve website issues

Recently, one of JDS’ clients reached out for assistance, as they were experiencing inconsistent website performance. They had just moved to a new platform, and were receiving alerts about unexpectedly slow response times, as well as intermittent logon errors. They were concerned that, were the reports accurate, this would have an adverse impact on customer retention, and potentially reduce their ability to attract new customers. When manual verification couldn’t reproduce the issues, they called in one of JDS’ sleuths to try to locate and fix the problem—if one existed at all.

The Plot Thickens

The client’s existing active robot monitoring solution using the HPE Business Process Monitor (BPM) suite showed that there were sporadic difficulties in loading pages on the new platform and in logging in, but the client was unable to replicate the issue manually. If there was an issue, where exactly did it lie?

Commencing the Investigation

The client had deployed Splunk and it was ingesting logs from the application in question—but its features were not being utilised to investigate the issue.

JDS consultant Danesen Narayanen entered the fray and was able to use Splunk to analyse the data received. He could therefore immediately understand the issue the client was experiencing. He confirmed that the existing monitoring solution was reporting the problem accurately, and that the issue had not been affecting the client’s website prior to the re-platform

Using the data collected by HPE BPM as a starting point, Danesen was able to drill down and compare what was happening with the current system on the new platform to what had been happening on the old one. He quickly made several discoveries:

1. There appeared to be some kind of server error.

Since the re-platform, there had been a spike in a particular server error. Our JDS consultant reviewed data from the previous year, to see whether the error had happened before. He noted that there had previously been similar issues, and validated them against BPM to determine that the past errors had not had a pronounced effect on BPM—the spike in server errors seemed to be a symptom, rather than a cause.

Database deadlocks were spiking.
Database deadlocks were spiking
It was apparent that the error had happened before

2. There seemed to be an issue with user-end response time.

Next, our consultant used Splunk to look at the response time by IP addresses over time, to see if there was a particular location being affected—was the problem at server end, or user end? He identified one particular IP address which had a very high response time. What’s more, this was a public IP address, rather than one internal to the client. It seemed like there was a end-user problem—but what was the IP address that was causing BPM to report an issue?

Daily response time for all IPs (left axis), and for the abnormal IP (right axis). All times are in seconds.

Tracking Down the Mystery IP Address

At this point our consultant called for the assistance of another JDS staff member, to track down who owned the problematic IP address. As it turned out, the IP address was owned by the client, and was being used by a security tool running vulnerability checks on the website. After the re-platform, the tool had gone rogue: rather than running for half an hour after the re-platform, it continued to open a number of new web sessions throughout the day for several days.

The Resolution

Now that the culprit had been identified, the team were quickly able to log in to the security tool to turn it off, and the problem disappeared. Performance and availability times returned to what they should be, BPM was no longer reporting issues, and the client’s website was running smoothly once more. Thanks to the combination of Splunk’s power, HPE's active monitoring tools, and JDS’ analytical and diagnostic experience, resolution was achieved in under a day.